by Dr Rob Liddiard, University of East Anglia
A Threatened Coastline
Although it is difficult to imagine today, during the Second World War the area around Walberswick was heavily defended against German attack. This part of the Suffolk coastline provided excellent potential landing beaches and the close proximity across the North Sea to occupied Holland and Belgium meant that it was vulnerable to German raids or full-scale invasion.
During 1940, when the threat of German invasion was at its greatest, the coast was hurriedly put into a state of readiness by the building of concrete pillboxes, trench systems and beach obstacles known as the ‘coastal crust’. What you can see at Hoist Covert in Walberswick are the remains of a small part of these defences.
Invasion Crisis
Until May 1940 little thought had been given to anti-invasion defence and those troops that were on the coast were there to keep watch and spend time training. The men stationed in and around Walberswick were from the 2nd/4th battalion the South Lancashire Regiment, who had only moved into Suffolk in April, but the following month they suddenly found themselves on the front line as the Germans overran the Low Countries and France.
The defence of Walberswick was the responsibility of ‘C’ company (about 120 men) who were spread out in a thin line stretching from the mouth of the Blyth to here at Hoist Covert.

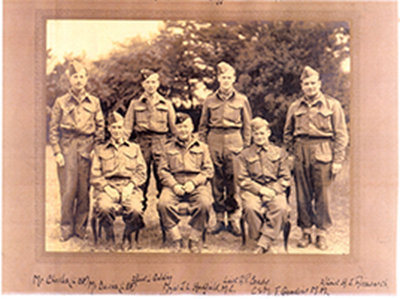
Image (left): C Company 2nd/4th South Lancashire Regiment in 1941; these men built and manned the position that can be seen today (Lancashire Infantry Museum). Image (right): The officers and senior NCOs of ‘C; Company 2nd/4th South Lancashires with senior men from the Walberswick Local Defence Volunteers (Home Guard) taken at Walberswick in the summer of 1940 (Lancashire Infantry Museum).
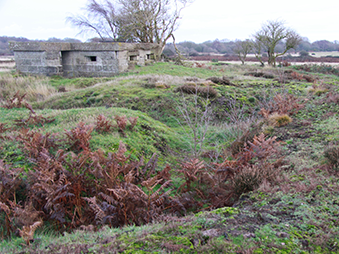
Hoist Covert Section Post, 1940
The position was a section post for ten infantrymen. The main defensive work is a long fire trench that had been partially filled in, but whose outline is easily traced. A shorter section of communication trench connects this fire trench to the concrete pillbox. The pillbox is known as a ‘Suffolk Square’, which is a design unique to 558 Field Company Royal Engineers, who were based in the county in 1940. Inside, the shelf for the occupants to rest their rifles on while firing can be seen, as well as a hook in the ceiling that was for a lantern or light. Originally the whole position would have been surrounded with barbed wire. In action, eight soldiers from the ten-man section were positioned in the trench, with the remaining two in the pillbox; only in the event of an air raid were all troops permitted to enter the pillbox.
Excavation has shown that the fire trench was over two metres deep and had a firestep which the troops would use when at their battle positions. In the invasion summer of 1940, the defenders were required to be within five minutes of their post at all times. There were also no plans made for withdrawal; in the event of invasion, the men were expected to fight until they were killed or captured.
Historical research and archaeological excavation have shown that the position was built at slightly different times. The main fire trench was started on 10th May 1940 and was finished in June. In July 1940 the pillbox was added and at the same time the short section of communication trench was excavated to link up the two features. Hoist Covert is a rare opportunity to see a pillbox with its adjacent trench system intact. Originally, these kinds of defences were much more common, but today only few survive.
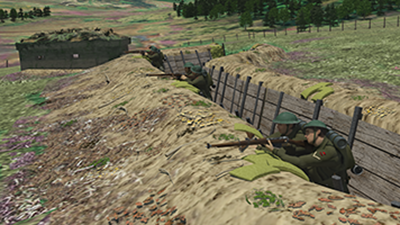
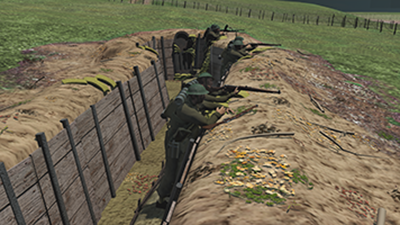
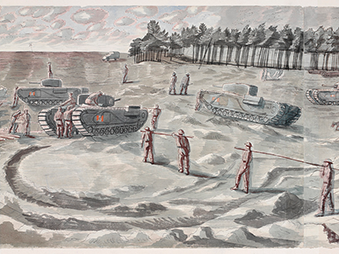
Image: Computer reconstructions of the Hoist Covert position as it may have appeared in September 1940. The scene shows ‘Stand To’, which took place in the early morning and late evening, when an enemy attack was thought to be most likely and when the defending troops had to man their positions for one hour (Virtual Past)
Abandonment and Re-Use, 1941 - 1942
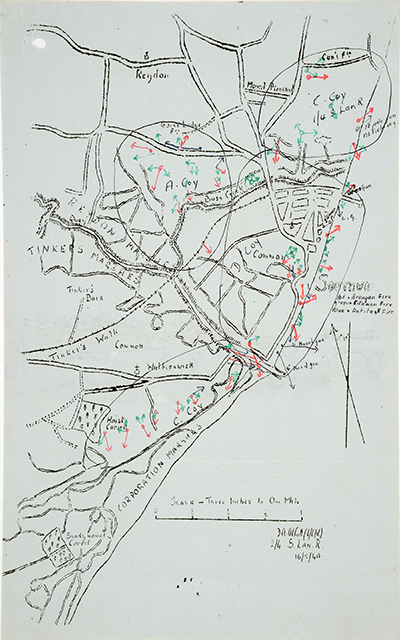
Image: Wartime plan of the positions of the 2nd/4th South Lancashire Regiment in July 1940 taken from the battalion war diary. It shows the length of the battalion line; Hoist Covert is towards the bottom of the picture. (The National Archives).
The planned German invasion of 1940 never happened and in 1941 Britain’s anti-invasion defences were re-organised. A new system based on all round defence of key points was initiated, which had a greater emphasis on mobile reserves inland. The village of Walberswick continued to be defended, but the Hoist Covert position was abandoned. During the latter part of the war, the trench and pillbox were a ready-made practice fortification and were used as target practice for mock assaults by troops training for D-Day. The bullet marks on the western face of the pillbox are not the result of a German invasion, but rather British troops using it for target practice.
After 1945 the area of the former section post was slowly covered with undergrowth and light woodland. This process led to the earthworks being preserved and they are now a rare survival from a time when it was widely believed that Britain was going to be invaded.
More of the 1940 defences built by the 2nd/4th South Lancashire Regiment can be seen from the coast path from here to Walberswick. Today, appropriate management ensures that the remains will be preserved for future generations.
Second World War Guidebooks
a series of four guidebooks to Suffolk's Second World War archaeology
Discover More »